
Autorka:
Dr Anna Guzik – puppeteer, actress, assistant professor, and speech therapist. She has collaborated with the “Arlekin” Puppet Theatre in Łódź, Zakład Krawiecki Theatre in Wrocław, the ME/ST Theatre in Warsaw, as well as the Form.Art Foundation in Łódź. She is currently working with the Foundation for the Creation and Promotion of Art – Ależ Gustawie! in Łódź, of which she is also a co-founder, and with the MER Theatre in Łódź. A lover of cats and good food.
Basic information:
When suspending short-string marionettes, the control should be set at such a height that the arm holding it forms a right angle at the elbow when the marionette standing beneath it has its legs fully straightened. This is the most comfortable position for the puppeteer and helps reduce strain on the forearm muscles.
In a long-string marionette, the control should be held so that it can freely pass below the railing of the marionette bridge structure when the puppet is standing, but not so low that the puppeteer cannot safely lean over the railing and place the puppet in a lying position without obstruction. During suspension, the control should also not be above the railing, because if the marionette steps onto a higher scenic element, the puppeteer will no longer have sufficient arm length to maintain the puppet’s vertical alignment.
The act of suspending the marionette, in both versions, must be carried out by two people working together. One person controls the control bar and ties the strings onto it, while the other attaches the strings to the eye screws placed on the puppet. When suspending a long-string marionette, the person attaching the strings to the control stands on the marionette bridge structure in order to simultaneously monitor the correct string length and the position of the control in relation to the playing plane.
Suspending a marionette according to the function of individual strings:
A very important aspect of a marionette, regardless of the length of the strings, is the proper order in which the puppet form is suspended on the individual strings and the correct tension of those strings.
The first and most important strings are the tensioning strings — in a horizontal control these are the shoulder strings. These are the strings that bring the puppet into a vertical position and determine the length of the remaining movement strings. They are two independent strings, attached to eye screws — small metal screws ending in a loop (every part of the puppet’s body should be equipped with them) — on both sides of the shoulders. We tie the ends of the strings to the eye screw using the following sequence: one knot, then a double knot, then again one knot, then a double knot, finishing once more with a single knot. If slippery synthetic strings are used, they may be singed and the heated end pressed onto the knots so that the fastening does not loosen. Then the other ends of both strings, together, should be threaded through the central hole drilled in the lower control and led to the central notch at its end, threading the string from top to bottom (fig. 7a). During this step, it is necessary to check whether the puppet’s shoulders are level and aligned on the same line. This is the responsibility of the person handling the puppet, who must visually inspect the correct position of the marionette’s shoulders. The task of the person handling the control will be to tighten or loosen one of the tensioning strings if necessary, in order to achieve symmetry in the puppet’s shoulders. Only once this stage has been completed correctly should the strings be led around the side notches, making one full wrap around them, and then alternately threaded from the central notch to one side, then to the other. At the final stage, the string should hang downwards from the central notch. This is how all strings attached to the control are tied on.
The next step is to attach two further independent strings to the puppet’s head, one on each side, and, after giving them the proper tension, tie them in parallel onto the head bar permanently fixed to the control. These are movement strings. Before fastening these strings onto the control itself, we should also check whether the already installed supporting shoulder strings are twisted where they enter the control. Untwisting them will eliminate the puppet’s later tendency to rotate around its own axis. Here again, constant cooperation and consultation between both people suspending the marionette is essential. In this step, special attention must also be paid to ensuring that the head strings are correctly tensioned — they should have a slight springiness — so that the marionette looks straight ahead when the control is held parallel to the surface on which it will move. However, the tension of these strings must not be greater than that of the supporting shoulder strings — the supporting strings must still bear the full weight of the puppet.
Throughout the whole suspension process, the control must be monitored so that it does not tilt or lean to one side in relation to the horizontal plane of the ground. This will help eliminate possible errors in the equal tensioning of all the marionette’s strings. After the shoulders and head have been suspended, the puppet should stand upright and not rotate to either side. This is a sign that the strings attached so far are stabilising it through correct tension and distribution.
Now one should move on to the next movement strings, this time the so-called running strings (fig. 7b): that is, tie a string to one hand, pass it through a special guide loop (two eye screws mounted on the front of the control — fig. 7a), and then lead it to the other hand. This makes it possible during animation to move both hands simultaneously. Once suspended, the puppet’s hands, in the resting position, should be slightly raised upwards, as in the preparatory position in ballet figures.
The second movement string — also a running string — is attached to the puppet’s elbows (fig. 7b). First, analogously to the hands, the string should be tied to one elbow, then passed through a loop in the wire attached to the control, and finally tied to the other elbow. In the case of a short-string marionette, this string may be looser, without marked tension, because the small distance between the control and the puppet means that if this elbow string is too springily tensioned, pulling the wire with the guide loop backwards during animation may cause the puppet’s elbows to bend too much. This is an exception; in long-string marionettes this rule does not apply.
The next stage is suspending the puppet’s legs. Here another important note must be added: above the main control there is a second, parallel control (fig. 7a), attached by means of two short cords, fitted only with a fastening in which the movable leg bar is mounted. In order to suspend the marionette’s legs properly, one should hold only this upper parallel control, and after tying two independent strings to the eye screws at each leg, lead the strings to the central outer notches of the attached bar and tie them on both sides. A valuable tip here is that when tensioning and tying the strings onto the bar, the person standing on the ground and responsible for tying the strings to the puppet should hold the marionette’s feet pressed against the floor, while the person tying the given string onto the control should pull it upward with full force. In this way the strings will be strongly and evenly tensioned. Another good and easier method is to lift the entire puppet slightly upwards and, while tensioning each leg in turn, check whether the string is tense while at the same time not bending the knee of the suspended leg. Throughout this process, one must also control the horizontal, parallel positioning of the movable bar in relation to the ground. This will later affect the even lifting of both ends of the bar when moving the marionette’s legs.
Once the legs have been suspended, the lower control with the remaining strings should again be taken in hand, and the final movement string — the back string — tied on, fastening it at the puppet’s coccyx. This string is then led to the notches at the very end of the control, where the shoulder strings were previously tied.
It is essential to remember to leave some string hanging loosely from the control (approx. 10–15 cm). This will make it possible, if one of the strings breaks, to suspend the marionette again using this reserve. Strings most often break at the eye screws on the puppet. It is then enough to untie the broken string from the control, using the length that has been left in reserve, and tie it again to the eye screw on the marionette.
If a running string breaks, unfortunately a new string must be used. In this case there is no possibility of shortening and reusing the existing broken one, because the proper proportion of its length would be lost.
The order in which the strings are attached must always be maintained, and one must remember how to perform these steps correctly. This is of enormous importance for the later functioning of the marionette itself. A precisely suspended puppet is like a precisely tuned musical instrument — only then will it play every note cleanly.
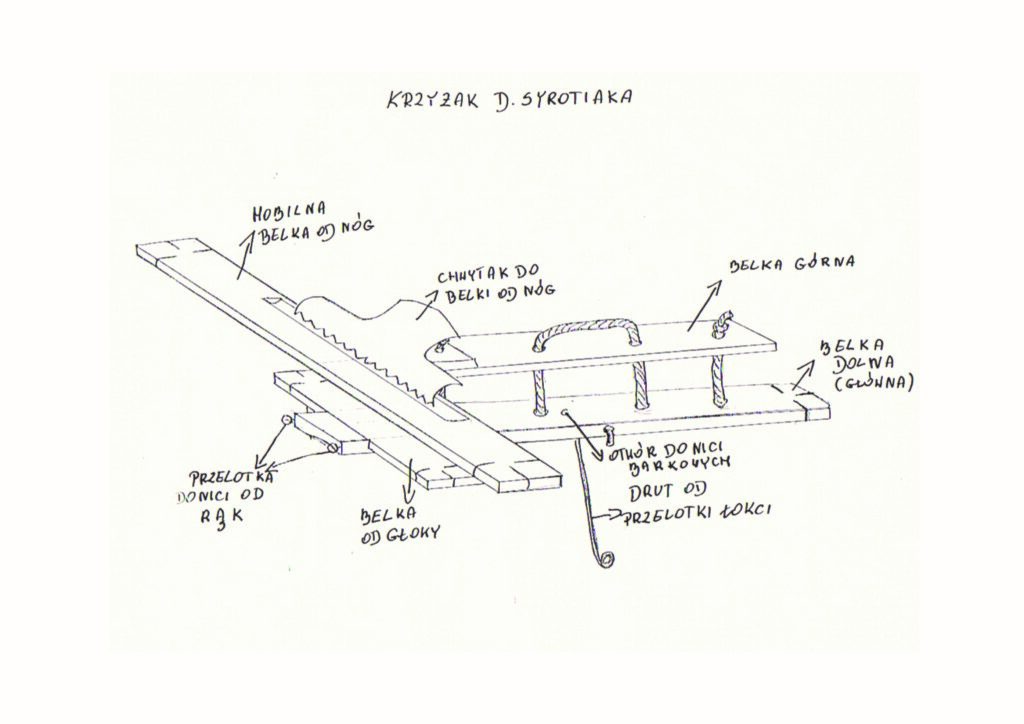
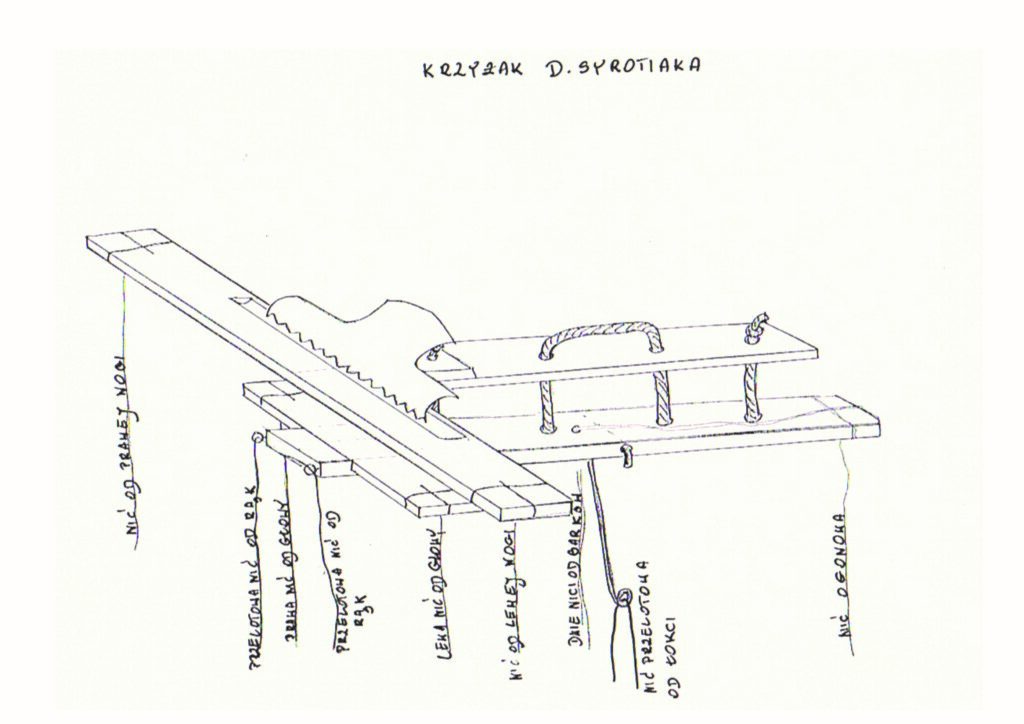
Control designed by D. Syrotiak. Control structure / Supporting and movement strings. (drawing by Jerzy Makowski)